Connect with Cloudflare Tunnel
Install cloudflared, create a named Cloudflare Tunnel, route a hostname to RepoTunnel’s local origin, and verify the managed connection.
Guides follow the current project source. Check the release notes for your installed version.
What this setup needs
The built-in Cloudflare provider uses a named tunnel, a tunnel token and a public hostname. RepoTunnel runs the local cloudflared worker and forwards to its reserved loopback origin.
- A Cloudflare account and a domain managed through Cloudflare for the published hostname.
- cloudflared installed on the same computer as RepoTunnel.
- Permission to create a tunnel and publish its hostname.
- RepoTunnel running with an approved project.
1 Install cloudflared
Open Cloudflare’s downloads page, select the correct operating system and CPU architecture, and follow its installation instructions. Install the executable on the computer where RepoTunnel runs.
Return to Connect, select Cloudflare and check for cloudflared detected on this computer. If detection still fails, check the installation location and restart RepoTunnel so it sees the updated environment.
cloudflared --version2 Create a named tunnel
In the current Cloudflare dashboard, open Networking, then Tunnels. Create a tunnel with a recognizable name such as repotunnel-desktop. Select the computer’s operating system and architecture under Setup Environment.
The dashboard’s connector instructions include the tunnel credential. Copy the token value from the installation/run command into RepoTunnel’s Cloudflare Tunnel token field. Use RepoTunnel to manage this connection’s worker after installing the executable.
- Open the Cloudflare dashboard and select the correct account.
- Go to Networking → Tunnels and choose Create Tunnel.
- Name the tunnel and create it.
- Find the tunnel token in the connector’s Install and Run instructions.
- Keep that token in the local app’s credential field; treat it as a secret.
3 Publish the localhost origin
Select the named tunnel, open Routes and choose Add route, then Published application. Pick a subdomain under a domain you administer.
Set Service URL to the HTTP localhost origin reported by RepoTunnel. The current reserved Cloudflare origin is port 43182. This service runs on the same computer as cloudflared; do not use the website preview port, a public hostname, or an arbitrary project development server.
Leave the optional Path field empty to forward all of RepoTunnel’s routes, then save the published route. The HTTP hop here is local to the computer; the client-facing hostname uses HTTPS through Cloudflare.
http://localhost:43182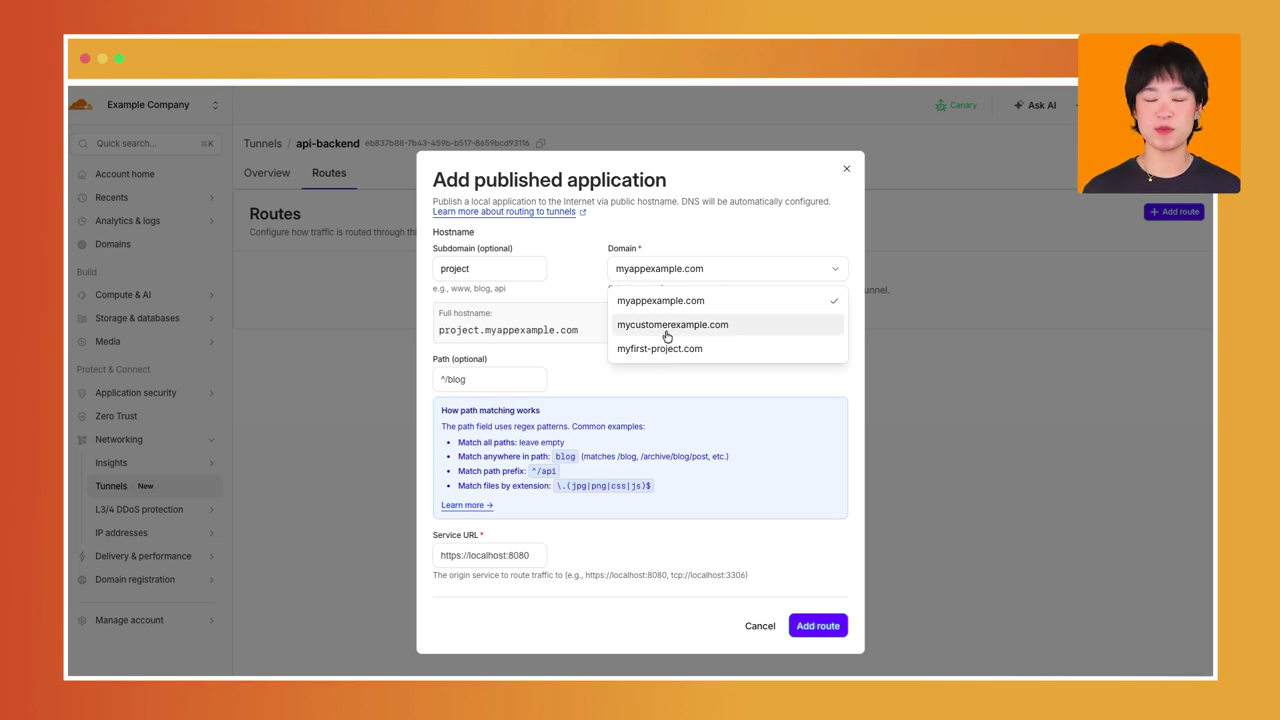
Cloudflare’s official tutorial shows Routes → Add route → Published application. Its sample service and path are examples; for RepoTunnel use the localhost origin shown in Connect and leave Path empty. Screenshot from the public tutorial at 2:30, © Cloudflare.
4 Connect from RepoTunnel
- Open Connect and select Cloudflare.
- Paste only the named tunnel’s token into Cloudflare Tunnel token.
- Enter the public hostname as an HTTPS origin: https://YOUR_PUBLIC_HOST, replacing YOUR_PUBLIC_HOST with your published hostname. Do not include /mcp in this field.
- Choose Set up & connect and wait for the local gateway and public provider to become ready.
- Copy RepoTunnel’s displayed MCP endpoint for your AI client.
Use a named tunnel for this provider
Cloudflare Quick Tunnels create temporary trycloudflare.com addresses. They are a testing path and differ from RepoTunnel’s configured named-tunnel flow.
Cloudflare documents changing hostnames, limited concurrent requests and no Server-Sent Events support for Quick Tunnels. Follow the named tunnel and stable hostname setup above for this managed provider.
Troubleshoot the failing layer
- cloudflared not detected: verify the executable’s installation and restart the app after environment changes.
- Tunnel disconnected: inspect the connector status, tunnel token and outbound network access using Cloudflare’s troubleshooting guide.
- Origin unreachable or 502: check the Service URL, same-machine localhost origin and RepoTunnel gateway status.
- Unexpected login page: inspect whether an additional Cloudflare Access browser policy is protecting this hostname and whether the MCP client supports it.
- Health works but tools fail: verify OAuth discovery, authorization and the exact /mcp endpoint.